Ever felt overwhelmed trying to understand how things get done in your organization? You’re not alone. That’s where process mapping comes in – it’s like drawing a map of your workflow. Let’s break it down in simple terms and get you started on your process mapping journey!
What Is Process Mapping, Anyway?
Think of process mapping as creating a visual recipe for how work gets done. It’s a way to show the steps in a process, who’s responsible for what, and how everything fits together. Instead of a jumbled mess of tasks, you get a clear picture of your workflow.
Why Bother with Process Mapping?
Good question! Here are some reasons why process mapping is worth your time:
- Clarity: It helps everyone understand how things work.
- Efficiency: You can spot bottlenecks and areas for improvement.
- Training: New team members can quickly grasp processes.
- Problem-solving: It’s easier to fix issues when you can see the whole picture.
- Communication: It’s a great tool for explaining processes to others.
Getting Started: The Basics
Ready to dive in? Let’s cover the essentials:

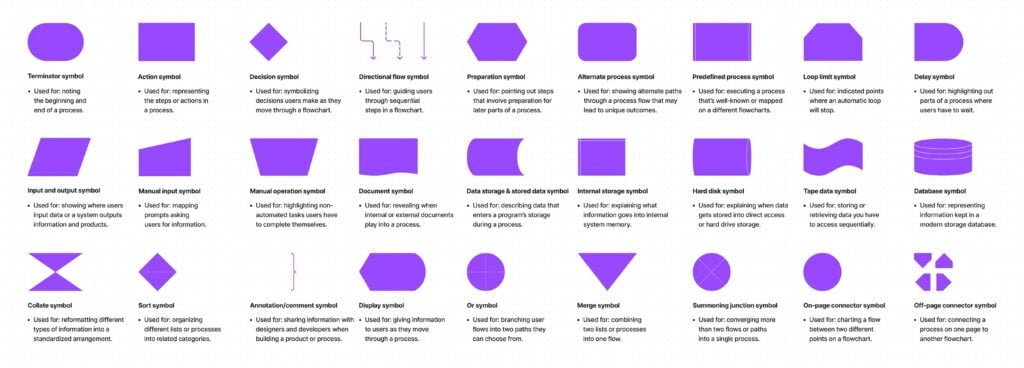
- Symbols: Process maps use different shapes to represent different things.
- Rectangles: Steps or activities
- Diamonds: Decision points
- Arrows: Show the flow between steps
- Flow: Arrows show the order of steps from start to finish.
- Lanes: Sometimes you’ll see “swimlanes” that show which department or person is responsible for each step.
Step-by-Step Guide to Creating Your First Process Map
Pick Your Process Choose something simple to start with, like making a cup of coffee or processing a customer order.
Gather Info Talk to people involved in the process. Ask questions like:
- What’s the first step?
- What happens next?
- Are there any decision points?
- Who’s responsible for each part?
Sketch It Out Grab a pencil and paper (or use a digital tool if you prefer) and start drawing:
- Put your start point at the top
- Add steps as rectangles
- Use diamonds for decisions
- Connect everything with arrows
Review and Refine Show your map to others involved in the process. They might spot things you missed or have ideas for improvements.
Make It Pretty Once you’re happy with the content, you can create a polished version using software like Visio, Lucid Chart, or even PowerPoint.
Tips for Process Mapping Success
- Keep it simple: Don’t try to show every tiny detail. Focus on the main steps.
- Use clear language: Avoid jargon or acronyms that not everyone might understand.
- Be consistent: Use the same style and symbols throughout your map.
- Think about the user: Who will be looking at this map? What do they need to know?
- Update regularly: Processes change over time. Make sure your map stays current.
Common Pitfalls to Avoid
- Making it too complicated: If your map looks like a plate of spaghetti, it’s time to simplify!
- Forgetting the big picture: Don’t get so caught up in details that you lose sight of the overall process.
- Ignoring input: Remember, the people doing the work often know it best. Listen to their insights.
Tools to Make Your Life Easier
While you can start with pen and paper, there are lots of great digital tools out there:
- Microsoft Visio: Powerful but can be complex
- Lucidchart: User-friendly with lots of templates
- Draw.io: Free and works in your browser
- Miro: Great for collaborative mapping
Remember, the best tool is the one you’ll actually use!
Real-World Example: Mapping a Coffee Shop Order
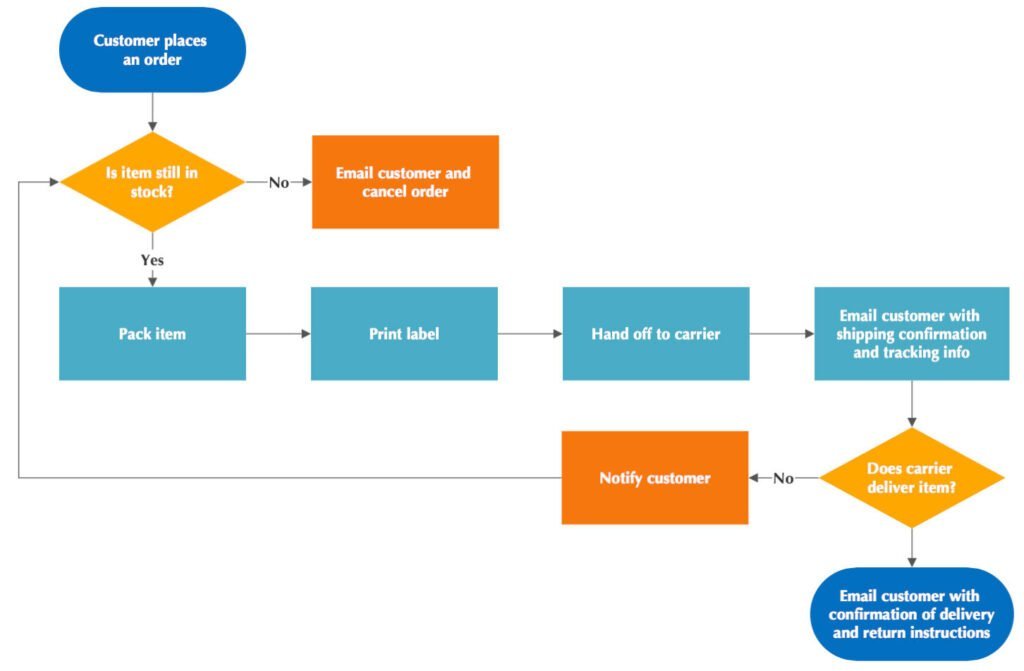
Let’s put it all together with a simple example: mapping the process of ordering, fulfillment and delivery.
- Start: Customer places an order.
- Check if the item is in stock:
- If NO: Email the customer to cancel the order.
- If YES: Proceed to the next step.
- Pack the item.
- Print a shipping label.
- Hand off the package to the carrier.
- Email the customer with shipping confirmation and tracking information.
- Notify the customer about the shipment.
- Check if the carrier delivered the item:
- If NO: Follow up with the carrier.
- If YES: Proceed to the next step.
- End: Email the customer with confirmation of delivery and return instructions.

Wrapping Up
Congrats! You’ve just taken your first steps into the world of process mapping. Remember, like any skill, it gets easier with practice. Start small, keep it simple, and don’t be afraid to revise as you go along.
Process mapping isn’t just about creating pretty diagrams – it’s a powerful tool for understanding, improving, and communicating how work gets done. So go ahead, pick a process, and start mapping!
Do you have any questions about process mapping? Or maybe you’ve created a map and want to share your experience? Drop a comment below – I’d love to hear from you!


